Loading interactive content…
Process Agent Commissions
How do I process agent commissions?
Debtors' cheques are technically a negative receipt applied to a negative invoice. In Debtors any time a negative value invoice is created and a negative value receipt is applied against that invoice, the system considers that the negative receipt transaction is a CHQ transaction.
This article will explain:
-
How to process agent commission
-
About the screens displayed during the process
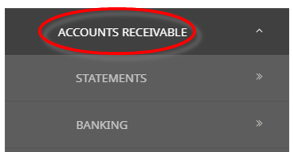
A.R. Agent Commission
Accounts Receivable Agent Commission is used to generate a commission payment for agents. The payment can be processed by generating a cheque or EFT (if EFT functionality is operational).
NOTE: Not all organisations require this functionality. This process is only used when a gross payment for the booking is collected, and a separate transaction is generated to process agent commission payments.
Booking Accounts Summary
![]()
The above screen capture shows a booking account summary. The invoice (Agent) value is 1,118.47 (nett booking retail value less commission), but the receipt value is 1,242.74 (gross booking retail value). This booking has been overpaid and is now in credit. When the Agent Commission process is run, this booking can be selected in a commission payment cheque run.
Process Agent Commission
-
From the Home menu, select Home > Financials > Accounting > Accounts Receivable > Agent Commission.
- Click the Home Menu to expand it:

- Click the Financials menu option to expand it:

- Click Accounting to go to the Accounting menu to expand it:

- Click Accounts Receivable to go to the Accounts Receivable menu to expand it:

- Click Agent Commission to go to the Agent Commission (filter) screen:

- Click the Home Menu to expand it:
-
On the blank Agent Commission screen, the Booking Tab will display. Select the required filters from the field selections within the tabs. View Booking Selection Filters to learn more about the available filed selections. Or view individual tab filters; Booking Tab, Analysis Tab (Booking and Agent), Over Paid Tab, or Others Tab.
-
Check the completed screens.
-
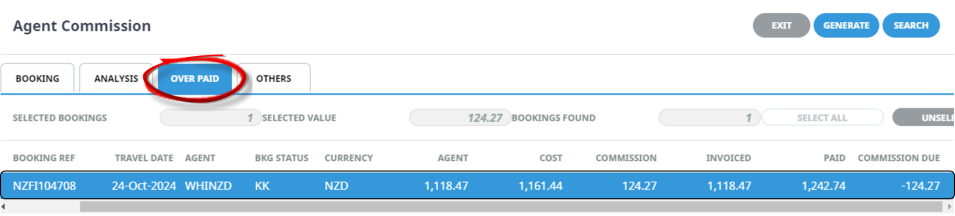
Click on the Over Paid Tab, select the Bookings to process using the checkbox at the start of each booking line or use Select All.
NOTE: If a required booking is not available check the Others Tab > Error column to understand why it is not available for processing.
-
Click Generate.
-
In the Create Receipts screen, update the required fields.
-
Click
 OK to keep the changes and save or update the entry.

-
When processing is completed a Receipt Summary screen displays a list of the transactions created.
-
Click OK, the Agent Commission screen will re-display.
-
To process additional Agent Commission payments, repeat the process from step 1.
-
Click Exit to return to the Accounting menu.


About Agent Commission Filters
The Agent Commission screen includes tabs that help you filter and select which bookings are included in a commission payment run.
![]()
Booking Tab
Travel Date From/To
Use these two fields to filter based on a specific booking travel date (or range of).
Date Entered From/To
Use these two fields to filter based on a specific booking entered date (or range of).
Agent From/To
If processing is to be done for a specific agent or range of agents, the selection can be made using these two fields.
Booking Name
Selection can be made based on a booking name.
Note: This field is based on a name contains criteria—i.e., entering Smi will find bookings with consecutive characters smi anywhere in the booking name—Smith, Smithers, Osmin etc.
Currency
This mandatory field refers to the booking currency (not booking invoice currency). Select the currency of the bookings to be included from the dropdown.
Booking Type
Select All Booking Types or only FITS or Groups as required.
Booking Status, Branch, Department
Multi select options for bookings with a specific Status, Branch, and Department can be selected using these checkboxes.
Analysis Tab
This screen allows filtering based on the Booking Analysis and Agent Analysis Codes attached to the booking agent. To expand the fields, use the +, and to minimise the analysis list use the -.
![]()
Bookings Analysis Codes 1-6
The top 6 analysis fields are the Booking Analysis Codes.
Agent Analysis Codes 1-6
The bottom 6 Analysis fields are the Agent Analysis Codes.
NOTE: Analysis codes in the above screen capture are used for training purposes. Users company systems will have analysis fields and codes unique to their organisational requirements.
Over Paid Tab
Two tabs display in Agent Commission - Qualifying Over Paid bookings and Others.
The Over Paid tab will display all bookings that meet the filter criteria and can be selected for processing.
Generate
Once bookings have been selected, the Generate button is used to proceed. The result is the creation of the agent commission transaction.
Selected Bookings
The number of bookings currently selected within the Over Paid tab.
Selected Value
The total value of the bookings currently selected within the Over Paid tab.
Bookings Found
The number of bookings found for the selected criteria.
Select All / Unselect All
Use these buttons to either select or unselect 'all' booking lines found.
Column Headings
NOTE: The column headings displayed in the above screen capture are for training purposes only. Users company systems will have columns unique to their organisational requirements.
Row Selection
To include a specific booking(s) from the list in commission processing, highlight the required row which will select the checkbox at the beginning of that row. Alternatively select the required checkbox(es) directly.
NOTE: Checking/Unchecking the checkbox in the column header will select/unselect all invoices within the list.
Booking Ref
The booking reference number.
Travel Date
The booking travel date.
Agent
The agent code attached to the booking.
Booking Status
The status of the booking.
Currency
The booking currency.
Agent
The agent value (booking retail less commission) of the booking.
Cost
This is the total of the booking service costs.
Invoiced
The value of all invoices, minus credit notes, for the booking.
Paid
The value of all cash receipts for the booking.
Commission Due
The value of the commission due to be paid on the booking. The result of the calculation received - invoiced.
Others Tab
The Others Tab displays bookings which have met the filter criteria, but do not qualify for further processing.
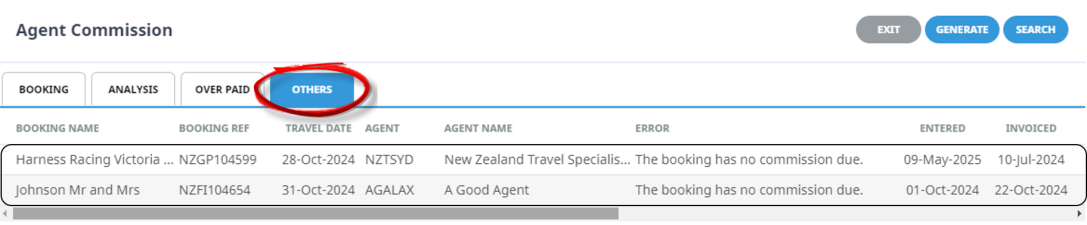
NOTE: The column headings displayed are the default columns available in this screen.
There is one variation in the column headings which display in the Overpaid versus the Others tab.
The variation is:
Error Column
The example above provides an error message saying: The booking does not qualify for further processing for this reason. E.g. the booking has not been fully receipted or the booking has no commission due.
Create Receipts
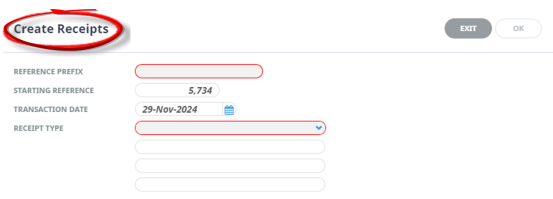
Reference Prefix
What is entered in this field will prefix the Start Receipt Reference.
Starting Reference
This is the starting transaction reference for the commission payment(s). For each agent that is selected in the processing run, the transaction reference will sequentially increment.
NOTE: A debtor’s cheque is technically a negative cash receipt. The Starting Reference field is populated with the System INI setting AR_NEXT_RECEIPT. This reference can be overridden with an actual cheque/EFT number when the cheque/EFT print is done.
Transaction Date
The receipt transaction date. The accounting period number and period begin/end dates display once the date has been entered.
Receipt Type
Receipt types are used to direct the bank account posting of cash transactions to the correct GL account. In Debtors, a cash transaction will credit the debtors control account and debit the bank account. Receipt types can be set up (Code Setup > Debtors > Receipt Type) with a specific GL account attached to it. This GL account is used instead of the default system bank account for the debit posting.
User Text 1 – 3
These three fields can be used to record additional information about the transaction. They can be labelled as part of the receipt type set up.
Agent Commission Receipt Summary

NOTE: The column headings at the top of these scrolls are the only headings available for this screen.
If any transactions are not processed, they will show in the Error column with an explanation of why the processing failed.
Debtor Transaction List with Commission Payment
![]()
The commission payment displays in the debtor’s transaction list as a Cheque transaction type.
NOTE: Cheques can be physically printed by either:
-
highlighting the transaction to print in the transaction list in the debtor (as in Debtors Transaction List with Commission Payment above) and clicking Print, this will print one transaction.
-
printing a selected range of transactions in Accounting > Accounts Receivable > Print Receipts which will print multiple transactions.
Booking Accounts Summary with Cheque Transaction
![]()
The commission payment also shows in the Booking Accounts Summary as a Cheque transaction.